Modern Arduino Development
The Arduino ecosystem (devkit+IDE) is a fantastic prototyping platform. However, once projects get more serious the Arduino IDE begins to lose its luster. Where do the source files actually live? Why isn't the IDE auto-completing my custom classes? Where's the linter? Where's the LLM integration?
The Arduino 2.x IDE is a step in the right direction compared to the 1.x IDE, but is still too simplistic for intermediate and advanced projects. The editor is developed on Eclipse Theia, which is based on Visual Studio Code, but does not directly support VS Code plugins.
The new IDE is in many ways a frontend to the new arduino-cli which is itself a front-end to the arduino daemon. The arduino daemon makes one connection to the microcontroller and brokers serial data read/write to "pluggable monitors". The two monitors included out of the box are the serial plotter and serial monitor which receive serial data as JSON over websockets. Once again, these two tools are nice for introductory work but do not cut it for advanced use cases. Unfortunately, the pluggable monitor specification is not documented enough to create an arbitrary monitor from scratch. Another neat feature of the arduino-cli is the ability to compile and flash sketches directly from the command line. This is a very nice solution for using alternative editors if the Arduino Sketch directory format and dependency resolution is suitable.
However, sometimes a project needs an alternative directory layout and demanding plotting needs. This post outlines using a Makefile to compile and flash firmware to Arduino development kits as well as using a serial<->UDP bridge to allow using PlotJuggler as a serial visualizer.
System Configuration
A non-root user cannot access the Arduino microcontroller by default on most Linux installations. A udev rule can be used to grant permission.
A sample udev rule for an Arduino Nano saved as /etc/udev/rules.d/99-arduino.rules:
SUBSYSTEMS=="usb",ATTRS{idVendor}=="1a86",ATTRS{idProduct}=="7523",GROUP="plugdev",MODE="0666"
This rule adds the device with VID:PID 1a86:7523 to the plugdev group. The VID:PID for a device can be determined with lsusb.
$ lsusb
...
Bus 001 Device 010: ID 1a86:7523 QinHeng Electronics CH340 serial converter
...
The current user must be in the plugdev group to access the Arduino.
# usermod -a -G plugdev <username>
$ groups
... plugdev ...
If the user is in the plugdev group and the udev rules has the proper VID:PID, then loading and triggering the new udev rule should result in rootless access to the Arduino interface:
# udevadm control --reload
# udevadm trigger
Toolchain
The easiest method to get avr-gcc (the compiler) and avrdude (firmware uploader/downloader) is to install either the Arudino 2.x IDE or the Arduino CLI. The installers should populate a $HOME/.arduinoXX directory with the necessary binaries. The Arduino CLI may require installing the avr core via the CLI.
sudar/Arduino-Makefile is a great starting point for using a Makefile to compile Arduino sketches. Create a directory third_party and either git clone or git submodule the Arduino-Makefile repository.
my_project
├── src
└── third_party
    └── Arduino-Makefile
The Arduino Makefile project takes care of many aspects of compiling and uploading Arduino code once configured properly. To do so, create a Makefile in src with the paths for the installed version of avr-gcc, avrdude, and the Arduino MCU.
ARDMK_VENDOR = .
ARDUINO_VERSION = 186

# Set paths to avr-gcc and avrdude
ARDUINO_DIR = ${HOME}/.arduino15/packages/arduino
AVR_TOOLS_DIR = ${ARDUINO_DIR}/tools/avr-gcc/7.3.0-atmel3.6.1-arduino7
AVRDUDE_DIR = ${ARDUINO_DIR}/tools/avrdude/6.3.0-arduino17
AVRDUDE = ${AVRDUDE_DIR}/bin/avrdude
AVRDUDE_CONF = ${AVRDUDE_DIR}/etc/avrdude.conf
Similar to the Arduino IDE, the Arduino board needs specified:
# Arduino Board Configurations
AVRDUDE_ARD_BAUDRATE = 115200
AVRDUDE_ARD_PROGRAMMER = arduino
MCU = atmega328
AVRDUDE_MCU = m328p

ARCHITECTURE	= avr/1.8.6
BOARD_TAG	= nano
Unlike the Arduino IDE, the libraries that are being used must be specified. The below lines say that user-added libraries are in third_party , of which we expect to use the Adafruit_NeoPixel library. Additionally, the system libraries Wire and EEPROM are used. Any additional libraries are required to be added to ARDUINO_LIBS
USER_LIB_PATH += $(realpath ../third_party)

ARDUINO_LIBS += Wire EEPROM
ARDUINO_LIBS += Adafruit_NeoPixel
Finally, the build output directory and Arduino Makefile locations are specified:
OBJDIR = $(realpath ../build-$(BOARD_TAG))

include $(realpath ../third_party/Arduino-Makefile/Arduino.mk)
A directory layout for the above Makefile, including the Arduino-Makefile project and Adafruit NeoPixel library looks like:
my_project
├── src
│   ├── main.ino
│   └── Makefile
└── third_party
    ├── Adafruit_NeoPixel
    │   ├── Adafruit_NeoPixel.cpp
    │   └── Adafruit_NeoPixel.h
    └── Arduino-Makefile
Running make will compile main.ino and make upload will flash main.ino to the Arduino.
Autocomplete, Lint, Formatting, etc
Any IDE can be used with the Makefile based toolchain outlined above. Despite the overkill that is using Electron for an IDE, codium (a Microsoft-free build of VS Code) provides a simple way to use clangd as a Language Server.
The clangd extension can be installed from the Extensions sidebar. In order to use code completion and other features, clang needs a compile_commands.json file to explain the build process. bear provides an easy way to generate the compilation database:
$ make clean
$ apt install bear
$ bear -- make
Next, configure clangd to use clang-tidy by modifying the clangd extension settings to launch clangd with the --clang-tidy argument.
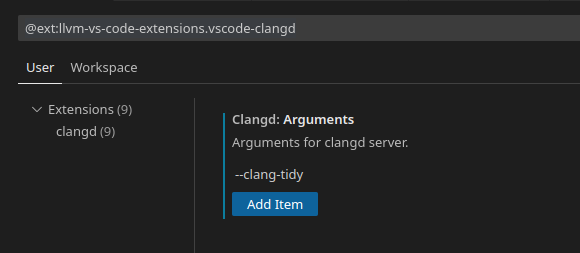
clang-tidy is configured by a .clang-format file, a good example being:
BasedOnStyle: Google
SeparateDefinitionBlocks: Always
EmptyLineBeforeAccessModifier: LogicalBlock
ColumnLimit: 100
The compile_commands.json and .clang-format files should be placed at the root of the project directory:
my_project
├── .clang_format
├── compile_commands.json
├── src
│   ├── main.ino
│   └── Makefile
└── third_party
    ├── Adafruit_NeoPixel
    │   ├── Adafruit_NeoPixel.cpp
    │   └── Adafruit_NeoPixel.h
    └── Arduino-Makefile
Adding a .gitignore to the project root prevents git from slurping up some of the one-off parts of the configuration. Depending on user preferences it may also be advisable to add third_party/ to .gitignore.
build-*/
compile_commands.json
.cache
Plotting
The Arduino 2.x IDE includes a Serial Plotter that plots data in a CSV-like format of key1:value1, key2:value2. For example, voltage:3.1,current:6.28\n results in two separate traces for voltage and current data. There are many usability flaws with the built-in Serial Plotter - axis limits cannot be set, X-Y plots are missing, only ten traces can be viewed at a time, the time window is fixed, etc. Fortunately there are many other plotting solutions that can be used.
Ideally, any plotting solution is backwards compatible with the built-in serial plotter. Kst is a great plotting tool but does not offer support for the key:value CSV-like format. serialplot supports the key:value format, interfaces directly with serial devices, and includes the ability to write data to the serial port, but lacks multiple plots. PlotJuggler offers a nice interactive user-interface but does not communicate directly with serial ports and does not provide a method for writing serial data; however, PlotJuggler's UX makes it worthwhile to overcome these limitations.
Despite what a LLM may say it is not this simple to get serial data into PlotJuggler:
However, PlotJuggler does provide a method to plot JSON packets sent over UDP and this one-liner pipes serial key:value data directly to PlotJuggler:
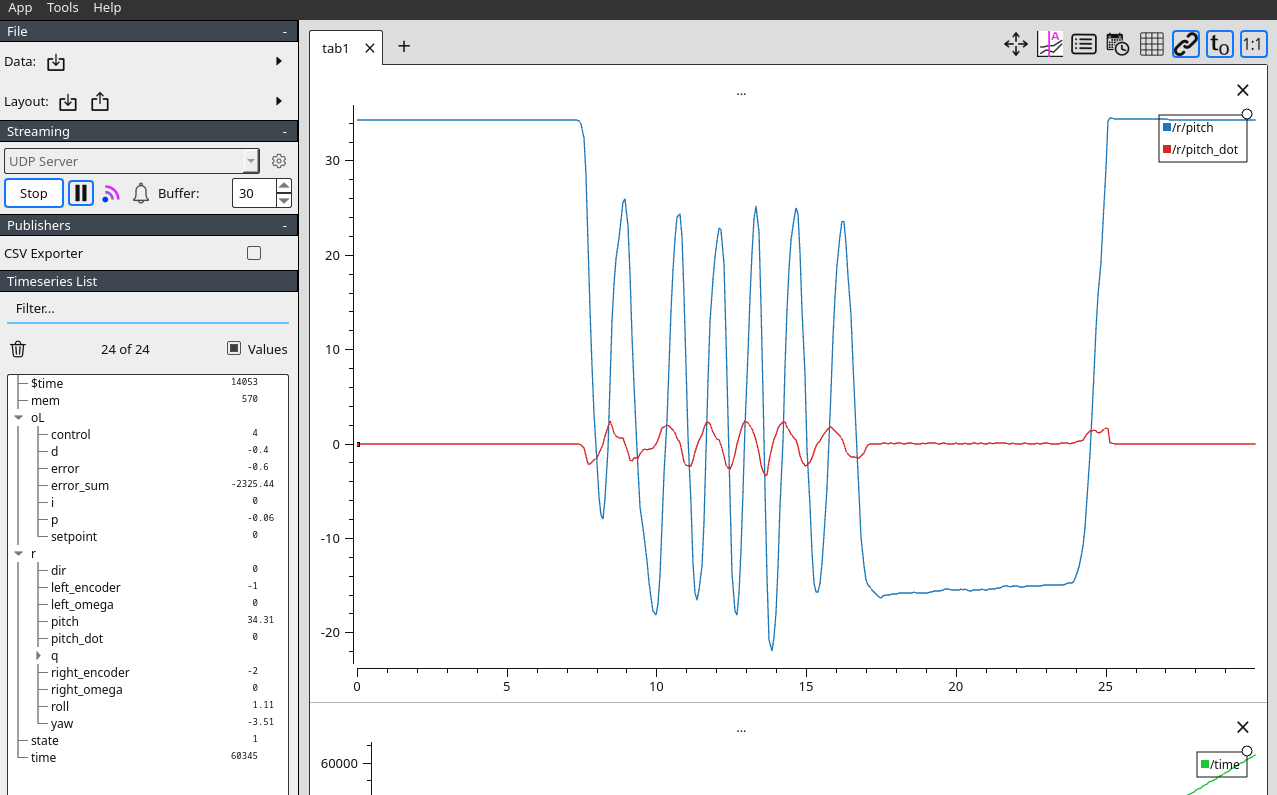
socat stdio /dev/ttyUSB0,raw,b115200 | sed -un 's/^\$//p' | jq -R --unbuffered 'split(",") | map(split(":")) | map({(.[0]): .[1] | tonumber}) | add' 2> /dev/null | socat - udp-datagram:127.0.0.1:9870This one-liner uses socat to stream serial data to sed which filters for only lines that start with $, which are then passed to jq to convert the key:value pairs into valid JSON, which is then passed back to socat to stream the JSON as UDP packets to the PlotJuggler UDP server. Using the $ sigil at the start of a line allows other libraries to print debug information to the serial terminal without being plotted. PlotJuggler will use the "/" delimiter to group signals in the Timeseries list, in the following example both pitch and pitch_dot are grouped under r because they were printed as ...r/pitch:34.31,r/pitch_dot:0... .
While the above solution allows quick plotting of serial data, it does not allow for writing data to the serial port, or viewing the lines that do not start with $. Additionally, it is not very Windows friendly.
Fortunately, Python has nice libraries for interacting with both serial ports and UDP packets. A simple program that replicates the bash one-liner above is:
import json
import serial
import socket
import sys
arduino = serial.Serial(port="/dev/ttyUSB0", baudrate=115200)
sock = socket.socket(socket.AF_INET, socket.SOCK_DGRAM)
def line_to_dict(line):
"""
Convert a key:value CSV line in the Arduino Serial Plotter
format to a dict.
For example, "time:10,b:2,c:3" becomes {"time":10, "b":2.0, "c":3.0}
"""
tree = {}
for pair in line.strip().split(','):
t = tree
key, value = pair.split(':')
parts = key.split('/')
for part in parts[:-1]:
t = t.setdefault(part, {})
if parts[-1] == "time":
t[parts[-1]] = int(value)
else:
t[parts[-1]] = float(value)
return tree
while True:
if arduino.in_waiting > 0:
data = arduino.readline().decode()
if data.startswith('$'):
json_data = json.dumps(line_to_dict(data))
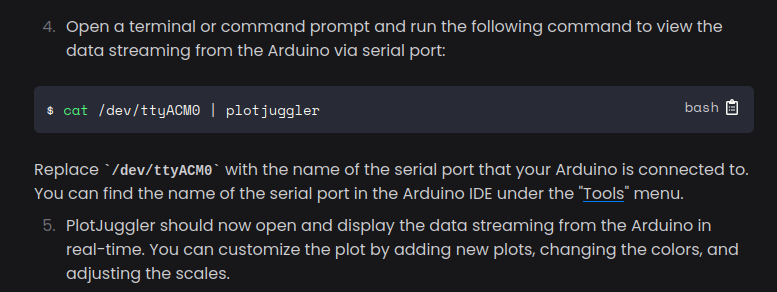
sock.sendto(json_data.encode(), ('127.0.0.1', 9870))A full-featured script to handle forwarding CSV-like serial data to UDP, MQTT, or websocket servers and writing serial data is available at bsilvereagle/serial_forward.
Live Reset
One of the nicest features of the Arduino IDE is the orchestration of stopping the serial plotter and serial monitor to upload new programs. Normally, a serial monitor like screen or minicom would retain full control of the hardware interface to the serial port, preventing avrdude from flashing new firmware. The Arduino IDE uses a daemon to broadcast the serial data to the serial monitor and plotter via websockets. When "upload" is clicked the daemon release control of the serial device and reclaims it once avrdude finishes uploading.
This behavior can be replicated with a little bit of signal handling. The Arduino Makefile has a RESET_CMD argument that can be overridden to send a HUP signal to any process using the Arduino device.
# HUP for Live Reset
RESET_CMD = fuser -k -HUP $(DEVICE_PATH) || /bin/true
The python program can handle the SIGHUP using the signal library.
import functools
import signal
...

def sighup_handler(signum, frame, aios):
    logger.info("Received HUP signal")
    aios.close()
    logger.info("Serial closed")
    time.sleep(10)
    logger.info("Reopening serial")
    aios.open()
    logger.info("Serial Opened")

handler = functools.partial(sighup_handler, aios=aios)
signal.signal(signal.SIGHUP, handler)
Was this an interesting read? Say thanks and help keep this site ad & analytic free by using my Amazon Affilliate URL. I'll receive a small portion of any purchases made within 24 hours.